Back to how-to articles
Setting up the generic entity-attribute-backend
Last updated: June 24, 2025

This article will go through getting started with the generic entity-attribute-backend. For details and source code see https://github.com/openearthplatforminitiative/entity-attribute-backend
This backend provides a simple interface to manage entities and their attributes, allowing for easy storage, retrieval, and manipulation of data.This might be useful for applications that require a flexible and extensible way to handle various types of data entities.It is designed to be a quick way to get started with entity management without the need for complex database schemas or configurations.
Running the application
The simplest way of getting started using this generic backend is to use the provided docker-compose.yml that can be found in the github repository.
This will setup both the required PostgreSQL database and the backend application.
The following steps will start the application with the default configuration:
1. Clone the repository
1git clone [email protected]:openearthplatforminitiative/entity-attribute-backend.git2. Navigate to the project directory
1cd entity-attribute-backend3. Start the backend
1docker compose up -dThe rest of this article assumes that the backend is started using docker compose and is running on http://localhost:8080. The api documentation can be found on http://localhost:8080/docs
Startup options
There are several options that can be tuned when starting the application. The following table lists the options and the outcome.
| Option | Default | Type | Behaviour |
|---|---|---|---|
| API_ROOT_PATH | "" | String | Changes the root path of the generated api. Can be useful when running behind a reverse proxy |
| LOG_LEVEL | INFO | NOTSET, DEBUG, INFO, WARNING, ERROR, CRITICAL | Sets the log level of the application |
| POSTGRES_USER | eav_user | String | Username to connect to PostgreSQL with |
| POSTGRES_PASSWORD | eav_pass | String | Password to connect to PostgreSQL with |
| POSTGRES_DB | eav | String | The name of the PostgreSQL database |
| POSTGRES_HOST | localhost | String | Host where PostgreSQL is running |
| POSTGRES_PORT | 5432 | Integer | Port where PostgreSQL is running |
| POSTGRES_SCHEMA | public | String | The schema to use in the PostgreSQL database |
| RUN_MIGRATIONS | True | Boolean | Indicates if alembic schema migrations should be run at startup. |
| IMPORT_ENTITIES | False | Boolean | Indicates if entity definitions should be imported at startup. |
| IMPORT_CONFIG | "" | String | Location of entity definition files |
| ENABLE_ADMIN_API | True | Boolean | Indicates if the admin api should be started. NB! There is no authentication to the admin api, so be careful if running this in production. |
| ENABLE_METRICS | False | Boolean | Indicates if prometheus style metrics should be exposed. |
| ENABLE_ASSETS | False | Boolean | Indicates if entities should support assets. E.g. uploading files |
| MAX_UPLOAD_SIZE | 10 * 1024 * 1024 | int | Sets the max file upload size in bytes. |
All the above configuration options can be specified by using environment variables.
Core concepts
Entity Definition
An EntityDefinition defines the blueprint for a type of entity in your system. It specifies:
- What kind of data this entity represents (e.g., "Incident", "Project", "Person")
- What attributes it should have (e.g., "description", "location")
- How it can relate to other entities (e.g., incidents can belong to projects)
Attribute Definition
An AttributeDefinition specifies the structure and rules for a single attribute that an entity of a given type can have. Each attribute has:
- A name (e.g.,
"location") - A type (e.g.,
"STRING","FLOAT","GEOMETRY") - Whether it is required or optional
- Whether it should be included in summaries or API responses
Entity
An Entity is an actual instance of a defined EntityDefinition. For example, an "Incident" called "River pollution" with a location and image.
Each entity:
- Refers to its
EntityDefinitiontype (e.g.,"Incident") - Has associated attribute values (via
Attributeobjects) - Can relate to other entities (via
EntityRelation) - May have linked assets (e.g., documents, images)
Entity Relation
An EntityRelation connects one entity to another — like a parent-child or logical grouping.
Each relation:
- Has a source entity and a target entity
- Is grouped in a
collection_name(like a named relationship:"events","attachments") - Supports flexible nesting (e.g., Project → Event → Incident)
Attribute
An Attribute holds the actual value of a field for a specific Entity.
Each attribute:
- Links to its entity
- Stores the value (e.g., name = "Gas Leak")
- Is interpreted using the corresponding
AttributeDefinition
Asset
An Asset represents a file or binary object (e.g., image, PDF, document) associated with an entity.
Each asset includes:
- A unique ID
- File metadata (filename, size, type, mimetype)
- A binary blob or external file URL
- A reference to the
Entityit belongs to
Configuring entities
By default there are no configured entities, and when starting the application for the first time it needs to be configured in order to be usable.
There are two ways of configuring the entities:
- With the admin api
- By importing entity definitions at startup
The recommended approach is to use the admin api for exploring and trying the entities, but import at startup for production use. The admin api should be disabled in production.
When starting the application with no entities defined, the api documentation will look like the following
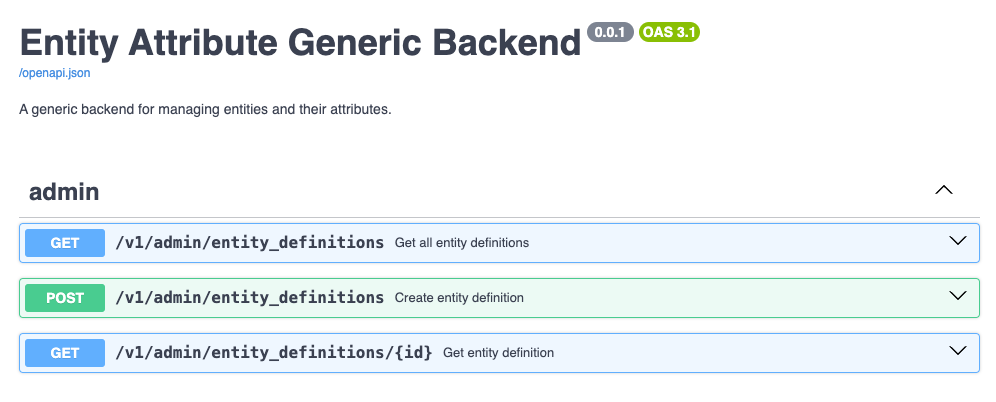
Using the admin api
The documentation for the admin api can be found (if enabled) on http://localhost:8080/docs
Defining an entity with the admin api
1curl -X 'POST' \
2  'http://localhost:8080/v1/admin/entity_definitions' \
3  -H 'accept: application/json' \
4  -H 'Content-Type: application/json' \
5  -d '{
6  "name": "Incident",
7  "collection_name": "incidents",
8  "apiEndpoints": ["LIST", "GET", "POST", "PUT", "DELETE"],
9  "returnSummaryOnCollection": true,
10  "supportsAssets": false,
11  "requiredAttributes": [
12    {
13      "name": "title",
14      "type": "STRING",
15      "includeInSummary": true
16    },
17    {
18      "name": "location",
19      "type": "GEOMETRY",
20      "includeInSummary": false
21    }
22  ],
23  "optionalAttributes": [],
24  "relatedEntities": []
25}'
Importing definitions at startup
Save the following json-content to the file /home/user/my_definitions/00_incident.json
1{
2  "name": "Incident",
3  "collection_name": "incidents",
4  "apiEndpoints": ["LIST", "GET", "POST", "PUT", "DELETE"],
5  "returnSummaryOnCollection": true,
6  "supportsAssets": false,
7  "requiredAttributes": [
8    {
9      "name": "title",
10      "type": "STRING",
11      "includeInSummary": true
12    },
13    {
14      "name": "location",
15      "type": "GEOMETRY",
16      "includeInSummary": false
17    }
18  ],
19  "optionalAttributes": [],
20  "relatedEntities": []
21}
Assuming you save your entitydefinitions in the folder /home/user/my_definitions/ you can set the following environment variables in order to import entity definitions at startup:
1IMPORT_ENTITIES=true
2IMPORT_CONFIG=/home/user/my_definitions/
The files in the directory will be imported in order of the naming of the files. So be sure to order the files so that any relations are imported before they are referenced.
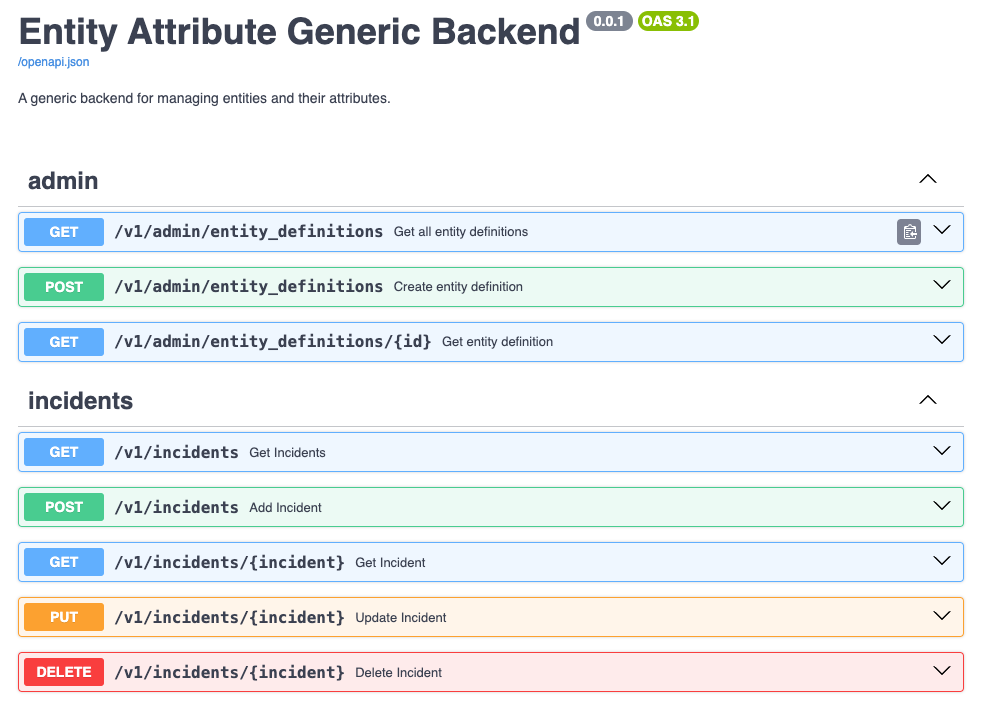
After importing the Incident entity defined above, the api documentation should look like the following:
Assets
Assets can be files that are linked to an entity. E.g an image or a pdf document.
In order to take advantage of assets, you first need to enable assets in the backend, by defining the environment variable.
1ENABLE_ASSETS=trueWhen the backend is started with assets enabled, entities can be marked as supporting assets.
Create the incident entity with support for assets
1{
2 "name": "Incident",
3 "collection_name": "incidents",
4 "apiEndpoints": ["LIST", "GET", "POST", "PUT", "DELETE"],
5 "returnSummaryOnCollection": true,
6 "supportsAssets": true,
7 "requiredAttributes": [
8 {
9 "name": "title",
10 "type": "STRING",
11 "includeInSummary": true
12 },
13 {
14 "name": "location",
15 "type": "GEOMETRY",
16 "includeInSummary": false
17 }
18 ],
19 "optionalAttributes": [],
20 "relatedEntities": []
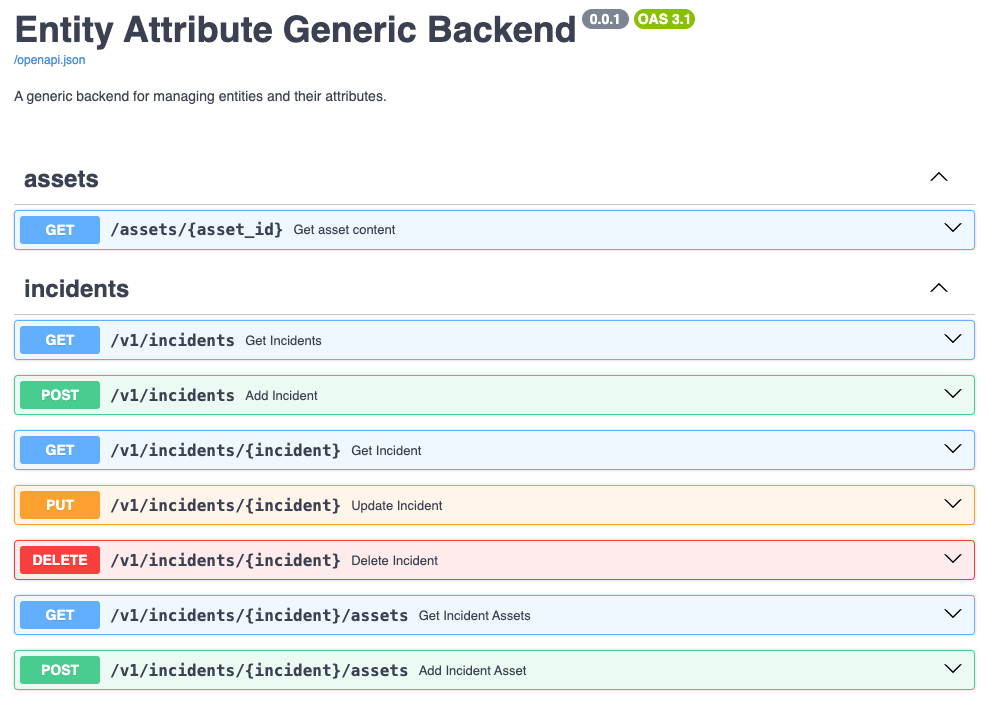
21}Note that "supportsAssets": true enables assets for this entity.
After importing the above entity with assets enabled, the api (without the admin api) will look like the following
Relations
Relations can be used to connect one entity to another. An example can be that an Event might have many Incidents related to it.
These can be defined like the following. Note that the target relation must be defined before the source entity.
00_incident.json
1{
2    "name": "Incident",
3    "collection_name": "incidents",
4    "apiEndpoints": ["GET"],
5    "returnSummaryOnCollection": true,
6    "supportsAssets": false,
7    "requiredAttributes": [
8        {
9            "name": "name",
10            "type": "STRING",
11            "includeInSummary": true
12        },
13        {
14            "name": "description",
15            "type": "STRING"
16        },
17        {
18            "name": "location",
19            "type": "GEOMETRY"
20        }
21    ],
22    "optionalAttributes": [],
23    "relatedEntities": []
24}
25
01_event.json
1{
2 "name": "Event",
3 "collection_name": "events",
4 "apiEndpoints": ["LIST","GET", "POST"],
5 "returnSummaryOnCollection": true,
6 "requiredAttributes": [
7 {
8 "name": "name",
9 "type": "STRING",
10 "includeInSummary": true
11 },
12 {
13 "name": "description",
14 "type": "STRING"
15 }
16 ],
17 "optionalAttributes": [],
18 "relatedEntities": [
19 {
20 "entity": "Incident",
21 "collection_name": "incidents",
22 "apiEndpoints": ["LIST", "POST"]
23 }
24 ]
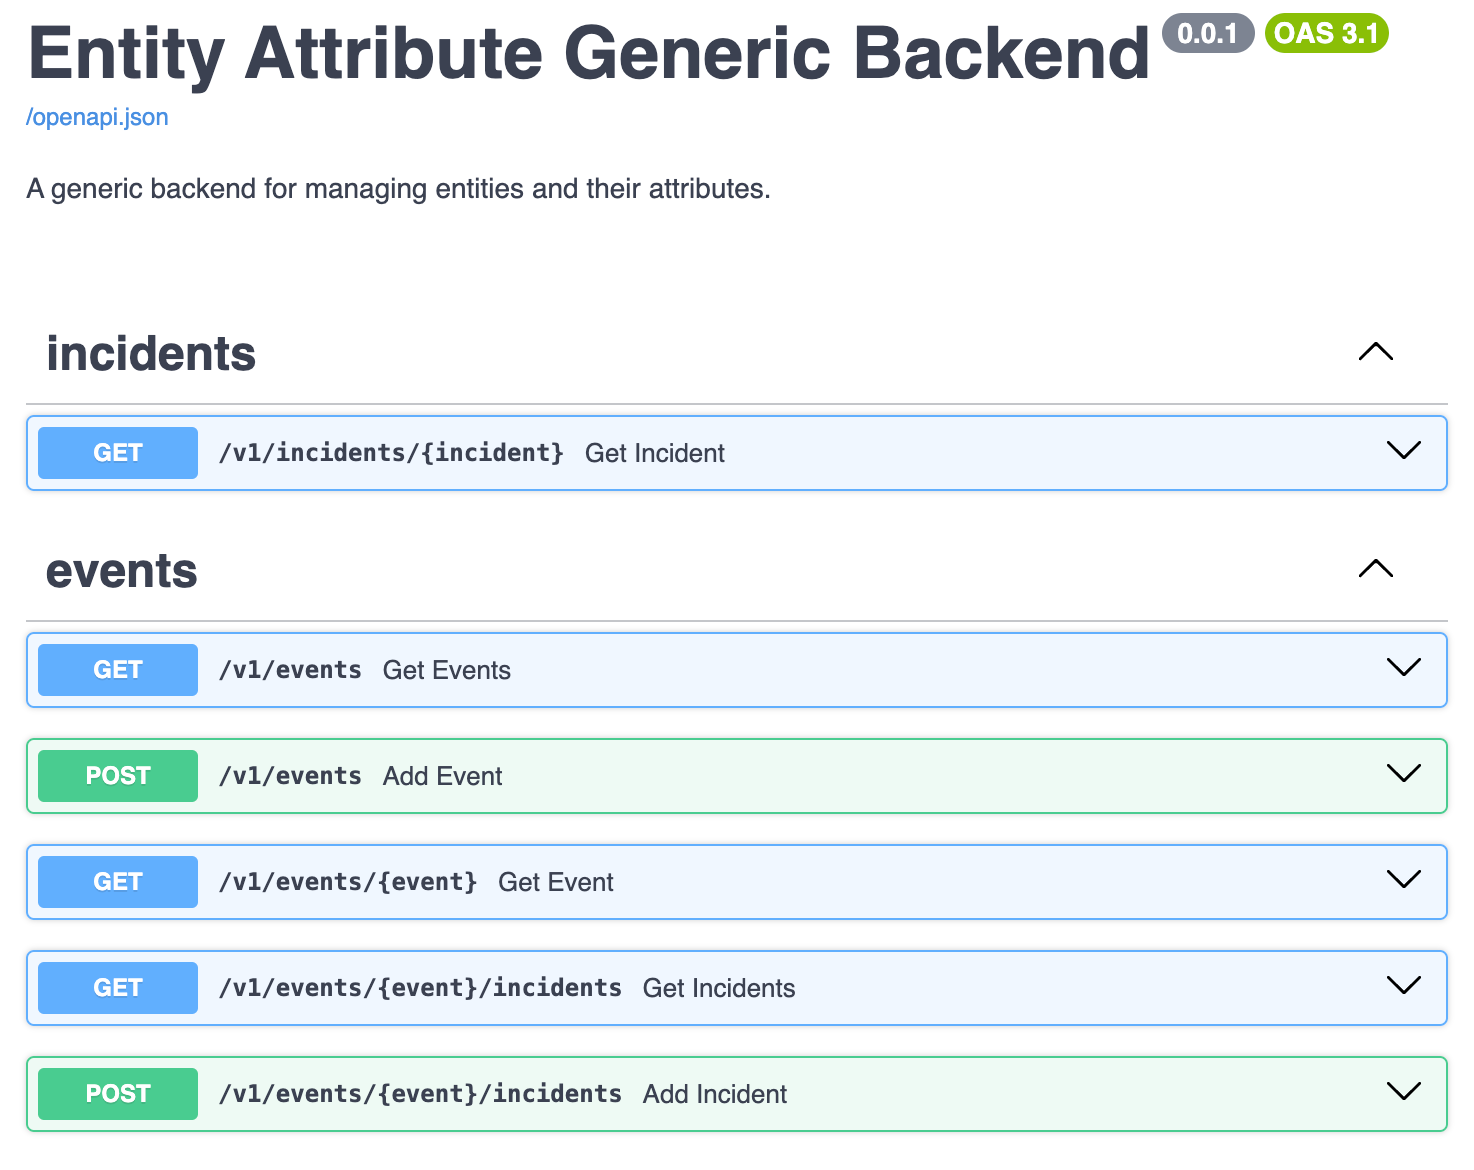
25}Note that you can specify the api endpoints for the relations specifically.
The above configuration will (assets are not enabled) will result in the following api
Using the entities
After importing the entities, the api will be fully functioning an working like a normal REST api, depending on the apiEndpoints defined for the entities.
Getting all incidents
1curl -X 'GET' 'http://localhost:8080/v1/incidents'Posting an incident
1curl -X 'POST' \
2  'http://localhost:8080/v1/incidents' \
3  -H 'accept: application/json' \
4  -H 'Content-Type: application/json' \
5  -d '{
6  "title": "River pollution",
7  "location": {
8    "type": "Point",
9    "coordinates": [
10      10,
11      60
12    ]
13  }
14}'
Examples
The following are examples of a definition of a backend for recording environmental incidents, and organizing them in projects and through events.
00_incident.json
1{
2    "name": "Incident",
3    "collection_name": "incidents",
4    "apiEndpoints": ["GET", "PUT"],
5    "returnSummaryOnCollection": true,
6    "supportsAssets": true,
7    "requiredAttributes": [
8        {
9            "name": "name",
10            "type": "STRING",
11            "includeInSummary": true
12        },
13        {
14            "name": "description",
15            "type": "STRING"
16        },
17        {
18            "name": "location",
19            "type": "GEOMETRY"
20        }
21    ],
22    "optionalAttributes": [],
23    "relatedEntities": []
24}
25
01_event.json
1{
2  "name": "Event",
3  "collection_name": "events",
4  "apiEndpoints": ["LIST","GET", "POST", "PUT", "DELETE"],
5  "returnSummaryOnCollection": true,
6  "requiredAttributes": [
7    {
8      "name": "name",
9      "type": "STRING",
10      "includeInSummary": true
11    },
12    {
13      "name": "description",
14      "type": "STRING"
15    }
16  ],
17  "optionalAttributes": [],
18  "relatedEntities": [
19    {
20      "entity": "Incident",
21      "collection_name": "incidents",
22      "apiEndpoints": ["LIST", "POST", "GET"]
23    }
24  ]
25}
02_project.json
1{
2    "name": "Project",
3    "collection_name": "projects",
4    "apiEndpoints": ["LIST", "GET", "POST", "PUT"],
5    "returnSummaryOnCollection": true,
6    "requiredAttributes": [
7        {
8            "name": "name",
9            "type": "STRING",
10            "includeInSummary": true
11        }
12    ],
13    "optionalAttributes": [
14        {
15            "name": "description",
16            "type": "STRING"
17        }
18    ],
19    "relatedEntities": [
20        {
21            "entity": "Event",
22            "collection_name": "events",
23            "apiEndpoints": ["LIST", "POST", "PUT", "DELETE", "GET"]
24        }
25    ]
26}